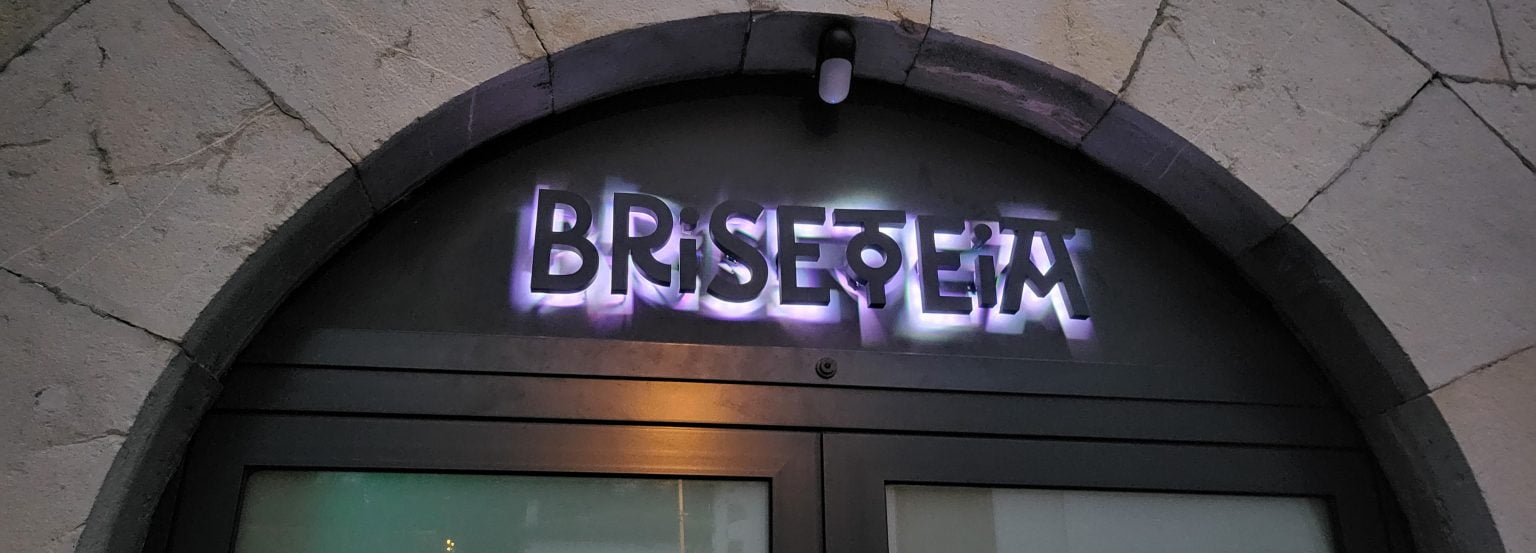
Create a light sign
Here is how I made the light brand of my restaurant, to do this I made the 3D modelsaton with the Logice Fusion 360, use ASA filament and print with my bambu Lab X1C.
Experience
The vectorization of an image consists in converting a matrix image (or bitmap) into a vector image.
The matrix images are composed of pixels, while the vector images are made up of paths or mathematical curves.

Software selection:
There are many software that can help vectorize an image, such as Adobe Illustrator, Coreldraw, or free online tools like Vectorizer.
Image preparation:
It is best to choose an image with high contrasts and clear lines.
Clean and simplify the image using image touch -up software to delete unnecessary noise and details.
Importing the image:
Import the matrix image in the vectorization software.
Use of the vectorization tool:
Use the automatic vectorization tool included in the software to convert the image to vectors.
For example, in Adobe Illustrator, this tool is called “Image Trace”.
Settings setting:
Adjust the settings to obtain the desired level of detail and eliminate the remaining noise.
Manual edition:
It may be necessary to manually retouch the generated vectors to obtain the desired aspect.
Use vector drawing tools to modify, add or delete paths.
Registration:
Save the vector image in an appropriate format like SVG, AI, or EPS.
Verification:
Check that the vector image has retained the essential details and the general appearance of the original image.
This process allows you to create an image that can be resized at any size without loss of quality, which is particularly useful for logos, illustrations, and other graphics which must be resized frequently.
Extrude
Extride a vector file in Fusion 360 can be made in a few steps.

Plan selection:
Select the plan on which you want to import your vector file.
SVG file loading:
In the dialog box, navigate to the location of your SVG file and select it.
Position adjustment:
Adjust the position, rotation and scale of your vector file if necessary, then click “OK” to place the file on the worktop.
Extrusion:
Select the “Extrude” tool (extruder) in the toolbar, often located under the “Create” tab (create).
Select the form (s) you want to extrude from the imported SVG file.
Extrusion parameters:
Define the extrusion distance and choose other options according to your needs (such as extrusion as a new body or fusion with an existing body).
Confirmation:
Click on “OK” to perform extrusion.
You should now see your extruded vector file in the 3D workspace.
Backup:
Remember to save your document to keep your work.
By following these steps, you should be able to extrude a vectorized file in Fusion 360.
The extrusion will transform your 2D drawing into a 3D object, which will then allow you to handle it further in the 3D merger 360 environment.
Widen

Negative extrusion:
Select the “Extrude” tool (extruder) under the “Create” tab (Create).
Select the text you created.
In the “distance” field, enter a negative value for extrusion.
This negative value will dig the letter in the material.
For example, a value of -5 mm will dig the letter of 5 mm in the material.
Make sure the “Operation” option (operation) is set to “cut” (cut) to remove the material.
Confirmation:
Click on “OK” to apply negative extrusion.
You should now see the letter dug in your material.
Adjustments:
If necessary, you can make additional adjustments by editing extrusion or text.
Backup:
Remember to save your document to keep your work.
These steps will allow you to dig a letter in a material using Fusion 360.
Negative extrusion is a useful technique for engraving text or other forms in 3D objects.
Place the fixings
I made in 3D a slide fixing system for ease of assembly and disassembly.
Depending on the size of your letters, it will be necessary to create a platform to place the fixing system.
You find the files here:
TéléchargerLED installation and programming
For LEDs you can use WS2812B
To control the LEDs I use an ESP32 with WLED
Télécharger